Simple for Beginners
Nails are an extension of what you wear. Great nail art can help bring out the best in girls. Who doesn’t love a little extra glamour on their nails? This guide will show you how to create beautiful, stylish nail art for beginners. If you are bored with your boring, inside nail color, and want something new, you can keep reading. You might find the perfect nail art design to suit your mood. These nail art designs can be achieved at home by following a few simple steps. So, let’s start!
- Orange and white Flames Nail Art
This nail art design is vibrant and new. It is a great shade combination and will give your nails a perfect summer look. If you want a different look, you can use multiple nail colors.
Nail Art Step By Step Tutorial
- For foundation, apply two coats of white nail varnish.
- Place the pieces diagonally across each other and apply orange nail polish.
- Place one more strip from top to bottom in the middle. Also, apply orange nail polish on one side.
- Apply the darkening to the base of your nails and place the strips as shown in the image.
- To achieve the desired look, apply a coat of very transparent polish.
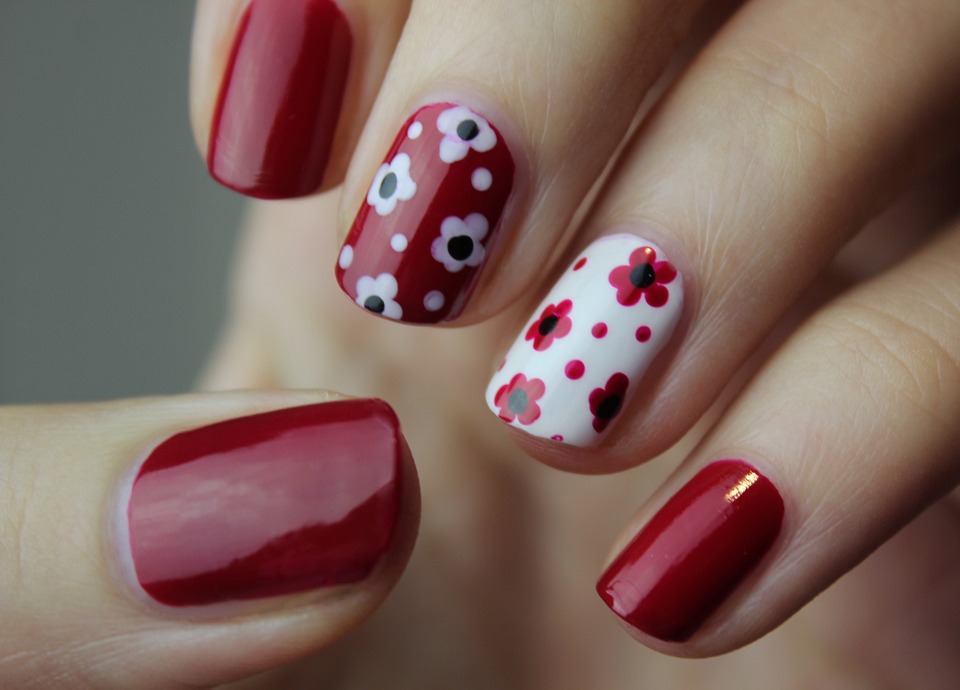
- Elegant Purple-Pink Floral Nail Art
These nails look amazing! It’s almost like having spring on your fingernails with the pink and white mixture. This is a simple, elegant and fresh design that can be recreated in just a few actions. This can be used to brighten up dull days or even brighten up a sunny summer day.

What you need to know
- A bright nail polish
- Purple nail polish
- Pink nail polish
- A skinny nail art brush or even a nail art pen
- Nail Designs Step By Step Tutorial
- Start by applying two coats white nail polish to your foundation.
- Use a thin clean to create blossoms with a pink nail polish.
- Purple nail polish can be used to give pink flowers more oomph.
- Finish with a top coat
- This look can be created by adding flowers to the nails.
- You can use more than one side. Other vibrant colors can be used over white foundation.
- Color Sprinkle Nail Art
This is the best way to create nail art. This is a great way to use your nails as a canvas and add many colors for an amazing effect. It is not difficult to do?
What you need to know
- Bright nail polish
- An angled nail art brush
- Glowing blue nail polish
- Pink nail polish
- Purple nail polish
- It is important to use the shades you choose for this look. You will still be amazed by the effect.
- Nail Designs Step By Step Tutorial
- For a great foundation, apply two coats of white nail varnish.
- After it dries completely, dip the brush in blue nail varnish and use your thumb to apply.
- Sprinkle the color on your nails.
- This method should be used for all colors unless you have the desired appearance.
- Use a well-respected coat.
- You can make your nails into a piece of contemporary art right now.
- Vibrant Clouds Nail Art
This style is easy to love. It’s bright, simple, vibrant, and so much fun. The ring fingernail is the only one we are using, while the rest of the medication has a minimal aqua-blue nail polish. This design is great for spring and summer.
What you need to know
- A brush
- Light blue nail polish
- An aqua green-blue nail polish
- Pink nail polish
- Nail Art Step By Step Tutorial
- Use the green-blue nail varnish except for your ring fingernail to paint all your nails.
- Use pink nail polish as a ring fingernail.
- Use a brush to create the clouds. Start with light blue nail polish, and then create the clouds.
- The actual up- and down lines are shown in the picture.
- After drying, you can use the green-blue nail varnish to create more clouds.
- The sunshine blue surface
- Apply clear polish to the top.
- It wasn’t so easy!
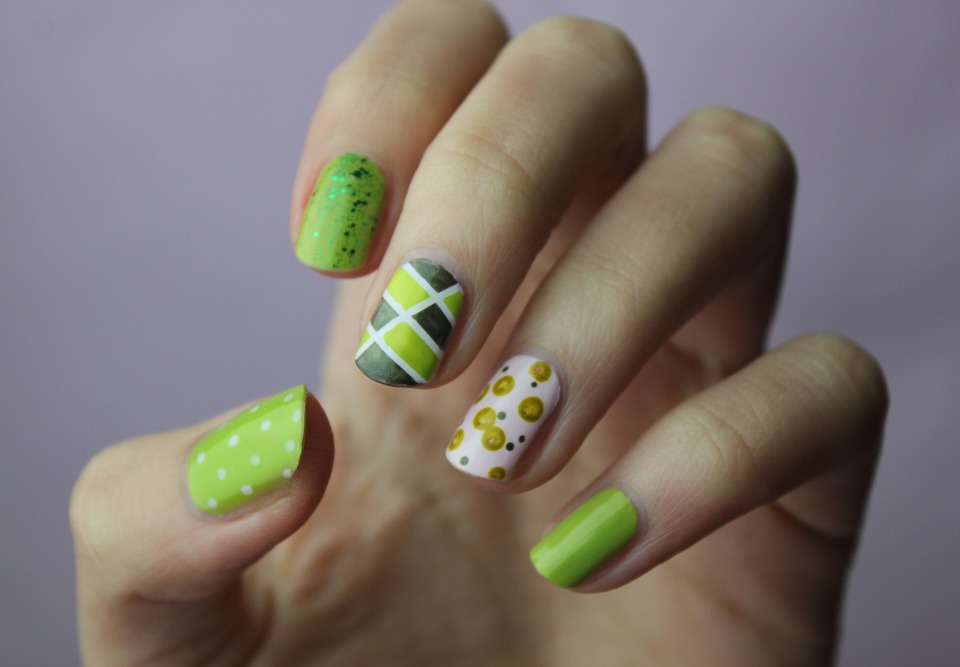
- Diagon-Alley Yellow & Pink Nail Art
This particular vibrant nail art is a treat for the eyes. This nail art is trendy, vibrant, and youthful. This can be taken off easily and will brighten up your day as well as your outfit!
What you need to know
- Yellow nail polish
- Purple-pink nail polish
- Nail art stripes
- Peach nail polish
- Topcoat
- Step By Step Tutorial
- Start by painting your nails yellowish.
- The lower half of the nail should be colored with a peach nail shine.
- You can repeat the process using the purplish pink nail polish.
- Finish the job with a top coat.
- Plastic Wrap Nail Art Designs
This unusual combination of lighting azure, gold and dazzling is amazing. This look can be worn gently or to match your gold costume. To create the unique texture in your nail, we will use plastic wrap.
What you need to know
- Lighting azure nail polish
- Nail polish in gold
- Clear polish
- Plastic wrap
- Step By Step Tutorial
- For foundation, apply two coats gold nail polish.
- Once the metal has drained, apply a blue nail polish to it.
- Use a crumpled piece of plastic wrap to cover your nail while it’s still damp.
- The actual gold nail polish will show through the blue, complete with a topcoat!
- White Minimal Chevron Nail Art
This minimal design is elegant and simple to replicate. This design is almost entirely white and can be used for any other color. It instantly elevates to a new level. Are you not?
What you need to know
- White nail polish
- Clear Polish
- Nail strips with thin edges
- Step By Step Tutorial
- Start by placing nail pieces on top of your nail, making three Vs.
- Apply white nail polish to the tips of your nails.
- Use a fine brush to finish the white-colored between the Versus.
- Remove the decals gently while they are still damp.
- To complete, apply the clear nail shine coat.
- Striped Aztec Nail Art
Although it may seem complicated, we have broken it down into just a few steps so you can understand how this looks at home. It’s that simple. It is the most beautiful design. We are also in love with the color combination. It’s amazing!

What you need to know
- Nail polish in gold
- White nail polish
- Black nail polish
- Thin brush
- Nail strips with thin edges
- Pink nail polish
- Step By Step Tutorial
- For your foundation, color your nails white.
- After it dries, you can use the nail stripes to create the gold stripes with the gold nail polish.
- Next, create the pink stripes.
- Use the exact same technique to create the black-red stripe on your nail.
- Create the Aztec style by using a thin clean as shown in the image.
- Add triangles to the middle of the diagram.
- To set, apply a coat of very transparent polish.
- Pink Ombre Nail Design
These are the results of pink contour nails. A pink lean is used to achieve them. They are adorable! The same technique can be used with any color you choose. This is a simple technique that can be used in just a few steps.
What you need to know
- Light-peach nail varnish
- Toothpicks
- Pink nail polish
- Sponge
- Step By Step Tutorial
- Apply a coat of the light-peach nail varnish.
- Use a small amount of each nail polish color on a clean surface, or a sheet of plastic material.
- Use a toothpick to blend the colors.
- Use a sponge or cloth to apply the combined colors.
- Gently rub the sponge onto the nail.
- Finish the look with a coat of clear polish.
- Simple? It’s easy?
- Nail art in gold glitter
This style is elegant and can be used when you need to go a little further! Isn’t it amazing? It’s also super quick and easy!
What you need to know
- Nail polish in gold
- Pink nail polish
- Dotting tool
- A fine brush
- Step By Step Tutorial
- Two coats of gold nail polish are enough to color your nails.
- Use the dotting tool to make pink areas around the edges.
- As seen in the photo, describe the pink and black nail polishes.
- Apply a coat of clear nail polish.
- Smokey Grey Nail Art
What you need to know
- A dark smokey grey nail polish
- Glitter
- A brush
- Clear polish
Step By Step Tutorial
- Use the darkish grey nail varnish to color your nails.
- Mix your nail polish, including glitter, on a clean surface.
- Use a brush to apply the polishes to your nails as shown in the image.
- Finish the look with a coat of clear nail polish.
- Chocolate Gold Nail Art
What you need to know
- Nail polish in chocolate brown
- Nail polish in gold
- Tape
Step By Step Tutorial
- Two coats of chocolate brownish nail varnish are enough to make the foundation.
- To form a triangle, place the strapping diagonally on top of the nail (as shown in the image).
- Apply gold nail polish to the triangular spot.
- Apply the clear polish coat to complete.
- Four-Leaf Clover Nails
It is very easy to recreate this particular nail art inspired by the four-leaf clover. The actual combination of light yellow and green has been taken care of. The four-leaf clover’s importance is that it brings good fortune to its consumers. This is enough reason to try this style. It’s easy to recognize.

What you need to know
- Green nail polish
- A pale yellow nail varnish
- A fine brush
- Specific
- You’re good to go!
- Use white strokes to decorate the hearts
- Use the pale yellow nail varnish as a foundation to color your nails.
- Use a thin brush, hearts and eco-friendly nail varnish.
- Two-toned blue nail art
This nail art design looks elegant and refreshing, and is easy to replicate. This look can be achieved with any two colors you choose. It’s easy to style your nails quickly.
What you need to know
- A light blue nail polish
- Nail strips
- Dark blue shimmer polish
- Specific
- Start by applying two coats of light-blue nail polish.
- Place the nail strip diagonally on your nail.
- Apply one coat of dark blue shimmer nail polish.
- Set your best upwards with a bright shine!
- Strawberry Fields Eternally Nails
Are you a fan of reddish, but tired of the same old red mani? This strawberry-inspired nail art design is a great way to try new things. This nail art design is fun and fresh, and can be used for summer.
What you need to know
- Light green nail polish
- Dark green nail polish
- Red nail polish
- White nail polish in a mellow yellow shade
- Specific
- Use a small brush to make dots on your nails.
- To create a 3D effect, draw a line around the darkish green nail polish using a lighter-weight green. This will instantly make the colors pop.
- Create your strawberry head using a dark green nail varnish and a thin brush.
- Apply a coat with clear shine and you’re done!
- Apply two coats red nail polish to your foundation.